Anyone who has met me knows I love a good deal. And by good deal I mean really fucking cheap. I recently vacationed in rural Virginia. I should move there because all the prices were stuck in 1983. $2.00 for a box of organic strawberries? Yes, please!
If you’re starting a coworking space you’re probably really turned on by furniture from Turnstone and Poppin’ and the like. Their wheelie furniture in fun colors is enough to make a bootstrapping coworking catalyst ball up protectively around her fashionably green nest egg. This is why I DIY or DIKEA for almost everything at Cohere and Cothere.
Most recently, I re-purposed some clear boards from our 1st space that have been sitting in storage as we didn’t have enough wall space at Cohere to hang them.
- Materials:
- 1/8″ clear Lexan in 4’x8′ sheets $104 each
- 1 quart interior latex paint in flat or eggshell sheen $0-15 depending on what you have laying around
- Paintbrush-Captain Obvious here. Seriously? You don’t own a paintbrush? $5
- Green frog tape. DO NOT use blue tape. That shit does not work. $6
- Measuring tape
- Dry erase marker
- Windex and paper towels
- Command Adhesive picture hanging velcro strips. A set of 4 for each board $8
Start with a 4’x8′ sheet of 1/8″ clear Lexan. We got ours from a wholesaler in Denver. If you can, have them cut it to your size needs. We cut most of our sheets in half for 4’x4′ clear boards but did make one smaller one 4’x2′ for our entry way wayfinding sign.
If you have to cut your boards, put masking tape in a straight line and cut through that so you don’t shatter your edges with a circular saw.
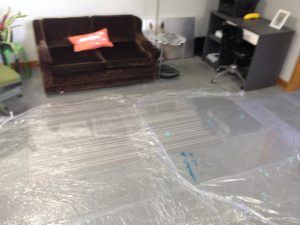
Don’t try to paint your clear boards on top of plastic. Turns out this renders them invisible as seen below.
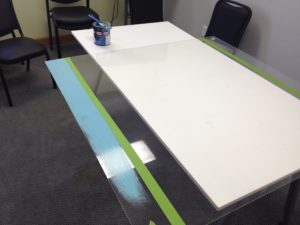
I wanted a 4″ strip of turquoise on the top and bottom of my boards for visual interest and so they wouldn’t be invisible on the wall, like Wonder Woman’s plane. Start by marking where 4″ is at frequent intervals with your dry erase marker. Use your green tape to make a straight line. Fold tape over the edges and run your fingernail down the to be painted tape edge to seal it completely.
It usually takes 3-4 coats to achieve desired opacity.
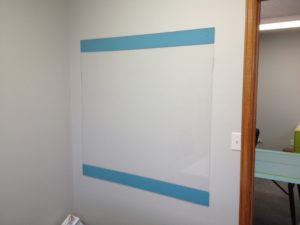
Mount to wall with Command Adhesives. Hint: use a level or a measuring tape and a friend to complete this. Lexan boards never shadow or stain and can be cleaned with Windex and paper towels.
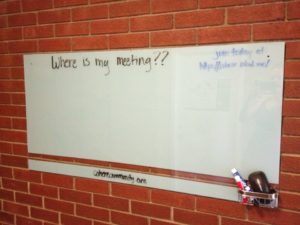
Here’s a bonus shot of our entry way board in Old Town. I painted the entire back of this one with the exception of a racing stripe because it’s mounted on brick. This little DIY board in our entry way has changed our lives. No more people wandering around lost across our various levels. Low tech and brilliant.
Grand total for two DIY 4’x4′ clear boards (assuming you have to buy every single thing) is $130. The more you make the more the cost goes down since a quart of paint would cover all of them and you only have to buy the brush and tape once etc etc etc. Compared to this, it’s a real bargain! Plus you get to customize the colors to match your logo or whatever.
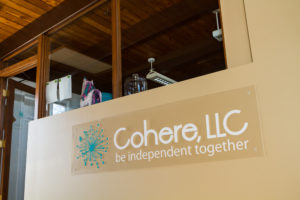
We also have our logo on a piece of clear Lexan at Cohere Old Town. It’s snappy looking and easy to do.